Updated on July 7, 2025
Time to roll out new Chromebook devices? Before setting your students loose with their devices, the Chromebooks must be enrolled in your school’s domain in order for administrative policies to be set and enforced. Fortunately, for those of you facing the task of mass enrollment, there are automated solutions available that will make the job easier.
Cheaper than your traditional outsourced “white glove service,” where you pay a fortune for enrollment per device, current innovations allow you to still do it yourself, but with less of the hassle. These automated provisioning solutions not only bypass the need to manually enroll each device, but are customizable and save your IT department valuable time, too! Keep reading to learn about some Chromebook configuration options that are at your disposal.
The USB Rubber Ducky

Would you believe me if I told you that it were possible to enroll all of your Chromebooks without touching the keyboard? Most, if not all, devices accept human input through keyboards, and many would argue that typing is the most tedious (and sometimes painful!) part about using devices.
To make your life easier, Hak5 has designed a USB Rubber Ducky. This device will mimic a keyboard’s input and can be programmed to automate your own keystrokes when plugged into a device.
In order to work, the Rubber Ducky must be encoded with a script that will emulate the keystrokes you use to enroll your device. Boasting a simple scripting language, no programming experience is necessary to write the script.
Lucky for you, since most Chromebooks are identical at the initial setup, school administrators have already shared their scripts online. This means all you have to do is copy their script into a text editing program, enter your school’s network and enrollment details, then encode and run your Rubber Ducky!
Note: It is important to remember that occasionally Chromebooks arrive with an out-of-date OS. To resolve this, you may be required to create a USB restore stick that will update the OS. Despite being an extra step, updating the OS means all students will have the up-to-date version from the beginning, and you still save time on pushing out the updates later!
Steps:- Use a text editing program such as Sublime Text or Notepad to write your own script or personalize an existing script that will enroll your devices. Save your script with the .txt extension.
- Encode the USB Rubber Ducky using the open-source duck encoder.
- Plug in the USB Rubber Ducky and watch the program run itself.
The Centipede
Advertised at around $9 per unit, the Centipede is a more cost-effective solution compared to the Rubber Ducky, which is listed at just below $45, and operates in the same manner.
Designed and maintained by Amplified Labs, this solution includes free open-source code but does require that you purchase an Arduino microcontroller for it to be installed on. Once installed, simply plugging in the Arduino will complete your keystrokes for you, enrolling your devices!
To keep the process simple, Amplified Labs provides you with step-by-step instructions and all essential starter code for the Centipede. Your script may then be personalized or modified using Arduino Create to achieve your desired results. Additional support is available from Amplified Labs’ comprehensive help center and Google+ community page.
Steps:- Purchase the Arduino microcontroller (Amplified Labs recommends this device).
- Create an account on Arduino Create.
- Program your Centipede on Arduino Create.
- Plug your Arduino into the device using a micro-USB cable.
- Run Centipede to enroll each of your brand-new Chromebooks!
The Open6 Charging Station Automated by Go-Box
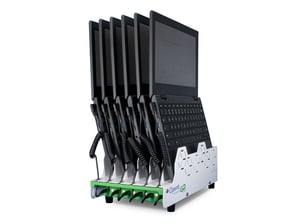
One of the newest solutions on the market, the Open6 Charging Station Automated by Go-Box, redefines how IT teams prepare, enroll, and deploy Chromebooks at scale.
By integrating JAR Systems’ Quick-Sense USB-C Charging with Go-Box’s reliable automation technology, the Open6 Automated by Go-Box offers a powerful response to expanding device inventories, limited budgets, and labor-intensive deployment workflows. This all-in-one solution streamlines Chromebook management, cutting down on time, labor, and costs, while ensuring fast, accurate, and dependable results. Each device connects via a single spring-back USB-C cable that delivers both power and data, helping reduce cable clutter and extend device longevity. Its compact design fits seamlessly into central IT offices or deployment workspaces where space is at a premium.
This solution supports up to six devices at a time and also features quick, one-time dashboard setup, which helps you program the devices. Select from ready-made templates to enroll any Chrome OS device— or build your own. Then plug in your Chromebooks, step back, and let the automation do the work.
Steps:- Set Up Automation:
Log in to the self-broadcasted admin dashboard from any device and choose a template. - Plug & Power
Connect up to six Chromebooks at a time using the pre-installed USB-C cables. The devices will begin to configure automatically. No more hunting for power bricks or outlets. - Repeat & Redeploy
Once the process finishes, simply swap in the next batch. Whether it be mid-year re-enrollment, or summer wipe-and-reset: Get hours of your day back.
Which One is Better?
The USB Rubber Ducky is an all-in-one solution that advertises itself as having a simple scripting language, which should make coding easy. Working out as inexpensive compared to the traditional "white glove" solution, the Rubber Ducky does cost more than the Centipede, with less online support.
Designed specifically to enroll Chromebook devices, the Centipede also includes its own open-source code that can be personalized. This may be better for those of you with little experience coding, especially as there are several websites aimed at providing support.
The Open6 Charging Station Automated by Go-Box, however, doesn’t just automate enrollment. With no coding required, it elevates deployment by combining AC adapter-free charging and hands-free provisioning into a cohesive, streamlined workflow. Capable of enrolling six devices simultaneously in 90 seconds, IT staff can prepare hundreds of Chromebooks in hours instead of days—saving time, reducing reliance on third-party support, and keeping devices consistently ready.
Using any of these methods, you can skip manually enrolling devices by hand and avoid mistakes from repetitive data entry. But if you’re managing hundreds of Chromebooks, the Open6 Charging Station Automated by Go-Box takes it a step further, combining charging and provisioning into a single solution. With tools like these, mass enrollment no longer has to be a burden—you might even start looking forward to it!
Streamline Your Chromebook Provisioning!
Redefining how IT teams prepare, enroll, and redeploy Chromebooks at scale, the Open6 Charging Station Automated by Go-Box fuses charging and hands-free provisioning into one streamlined workflow.
Click below to learn more about the Open6 Automated by Go-Box and request more information or a quote!
